Tutorials
A tutorial is a self-paced lesson for your students: explanations, figures and videos, mixed with activities such as multiple-choice questions, AI-graded short-answer questions, polls and an AI chat. You can let the Tutorial Generator build a first version from your slides, a video or a short brief, then refine it in the editor and publish it.
How tutorials work
- A tutorial can have several published versions (v1, v2, …). When you publish a new version the previous one is archived automatically and students are moved to the new version — their progress comes with them.
- A draft is your private working copy. Editing a draft never changes what students see until you publish it.
- Every student who opens a tutorial gets a session that records their answers and progress. You can review sessions and export them.
Open the Tutorials page
-
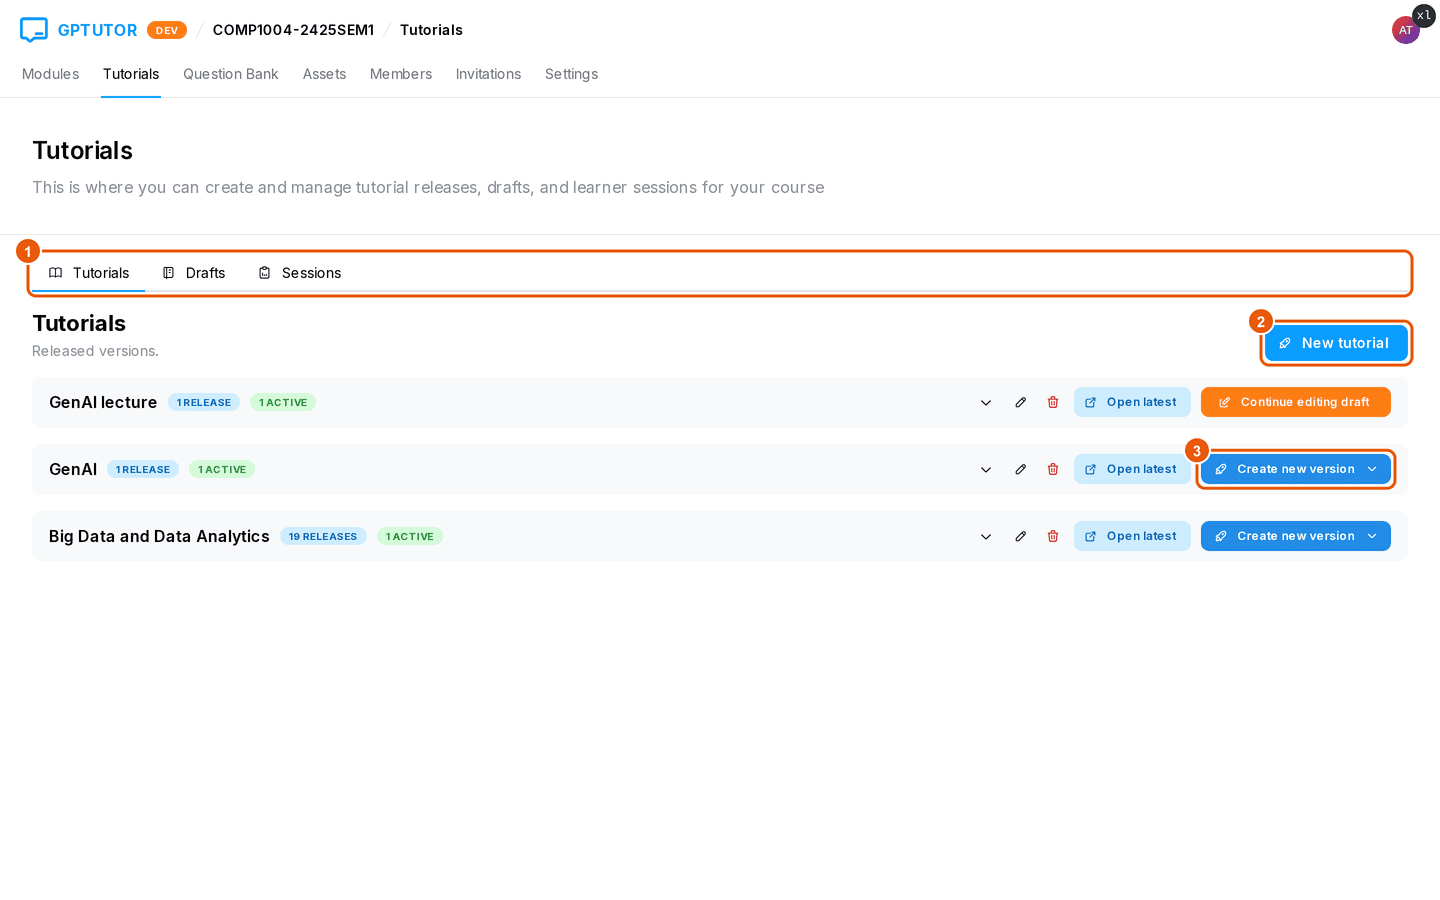
Open your course and click the “Tutorials” tab. Course admins see three tabs: Tutorials (published versions), Drafts (work in progress) and Sessions (student progress).
-
“New tutorial” starts the Tutorial Generator.
-
Each published tutorial has its own row with “Open latest” and “Create new version”.
Create a tutorial with AI
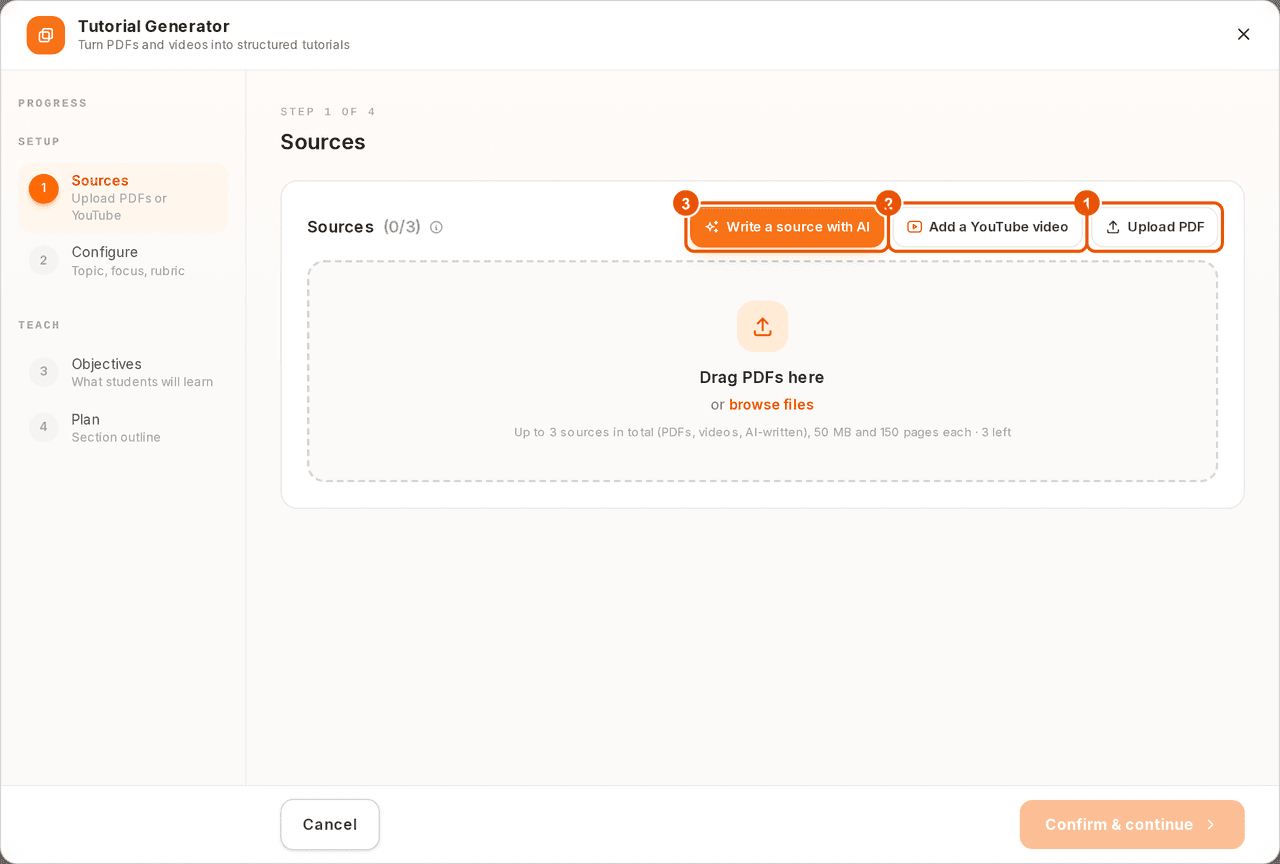
The Tutorial Generator walks you through four steps: Sources → Configure → Objectives → Plan. You can go back at any time; generation only starts when you confirm the plan.
Step 1 — Add your sources
-
Click “New tutorial”. Add up to three sources in any combination:
- Upload PDF — drag files onto the page or click “browse files” (lecture slides, notes, a paper). Up to 50 MB and 150 pages each.
- Add a YouTube video — paste a link to a single video (playlists and channels are not supported). The transcript is prepared for you.
- Write a source with AI — describe what the material should cover and let the model write a textbook-style text you can edit.
-
To add a YouTube video, click “Add a YouTube video”, paste the link to a single public video (for example
https://www.youtube.com/watch?v=_6R7Ym6Vy_I) and click “Add video”. Playlists, channels and private videos are not accepted.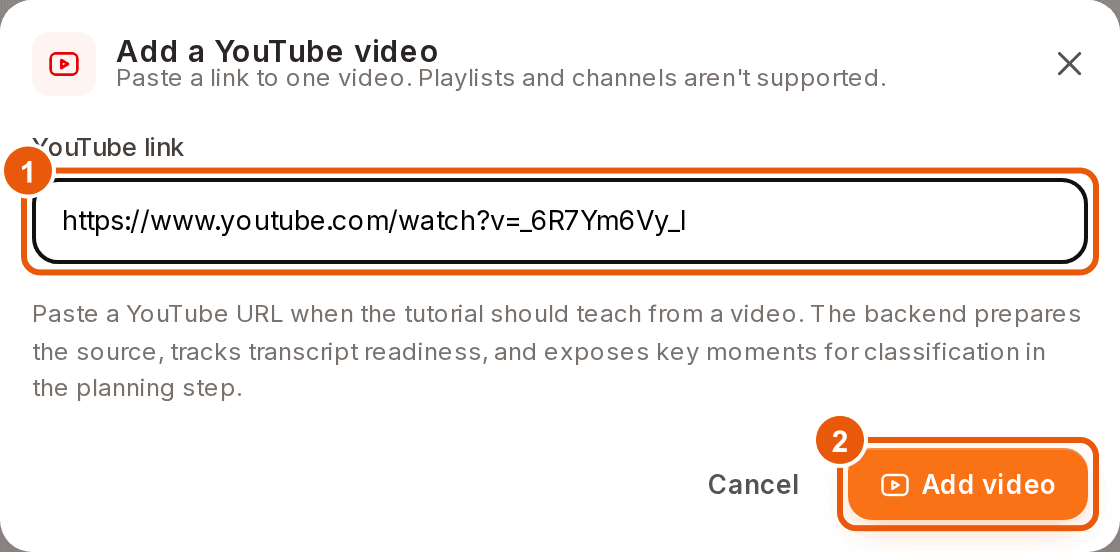
-
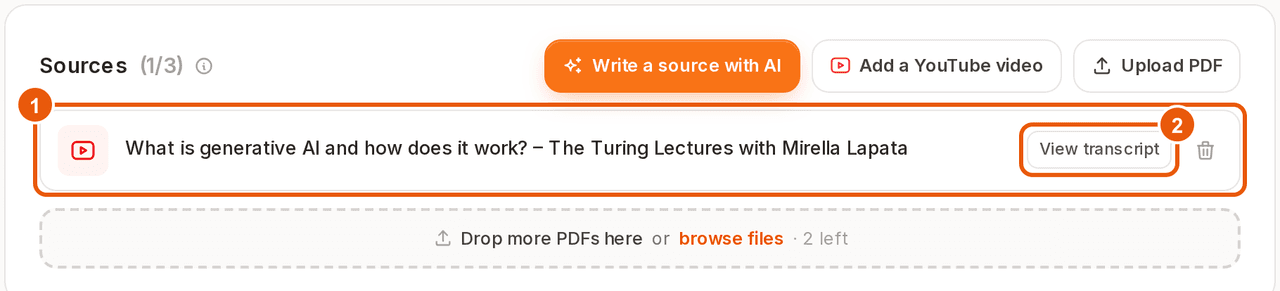
The video appears in the source list (1). Its transcript is prepared in the background — the row reads “Transcript pending” until it is ready, which usually takes a minute or two. Click “View transcript” (2) to check what the generator will work from.
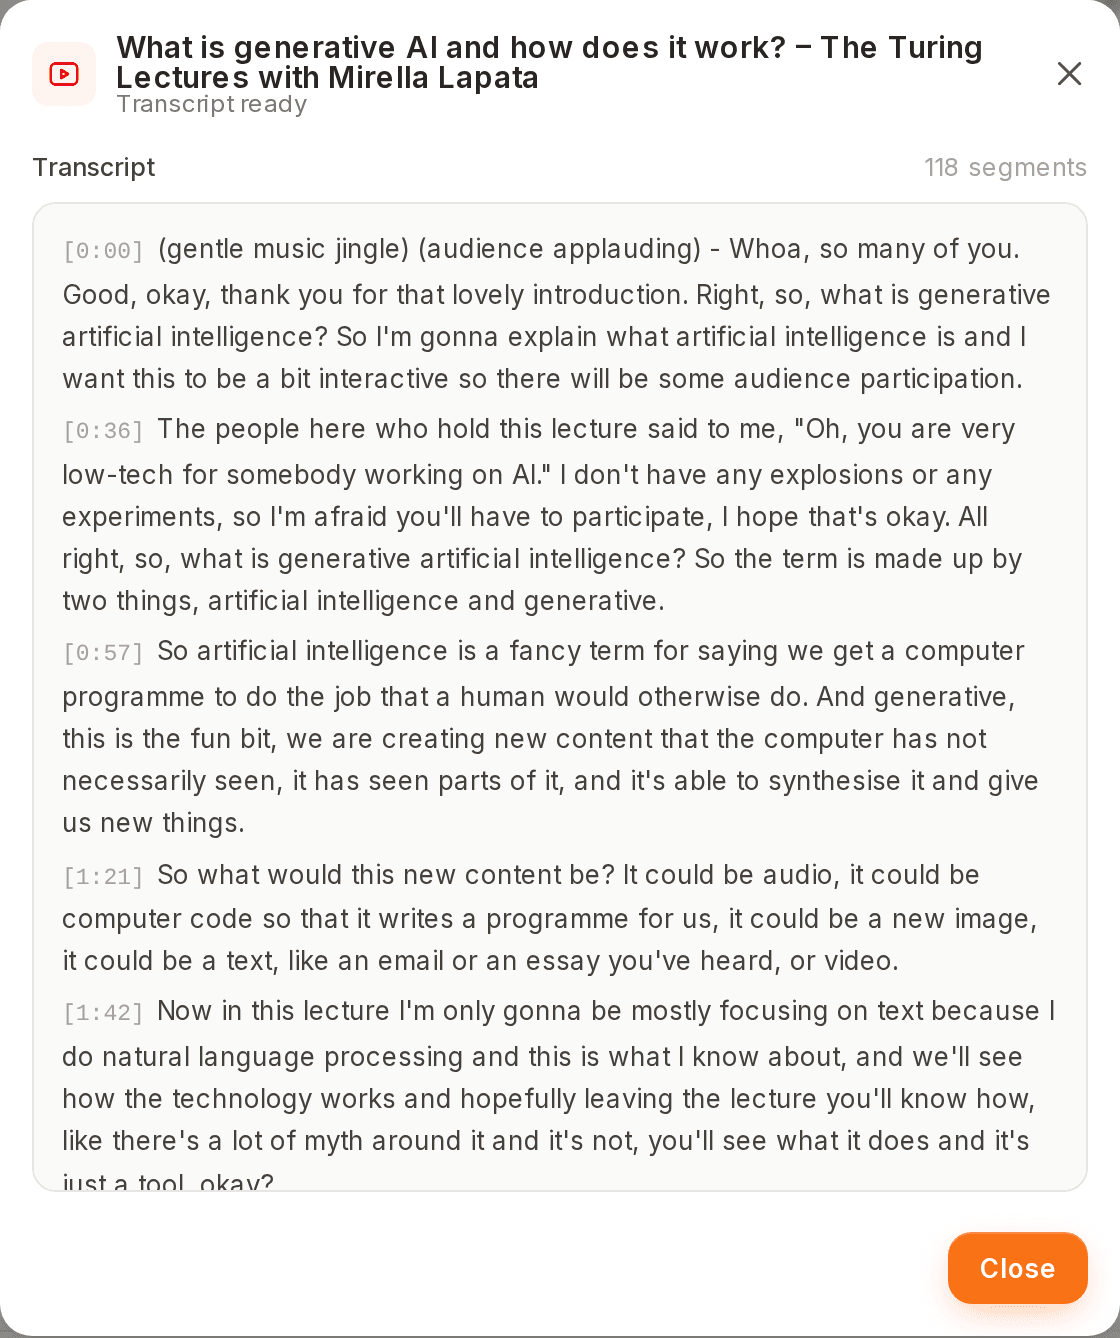
Note: The generator can use key moments of the video as clips inside the lesson, or show the full video before the sections — see “Video handling” in Step 2.
-
To write a source with AI, describe the topic, audience and depth, pick a style (Textbook, Blog or Lecture notes) and a length, then click “Generate”.

-
Review the generated text. You can edit it directly, switch to “Preview”, and then click “Add as source”.
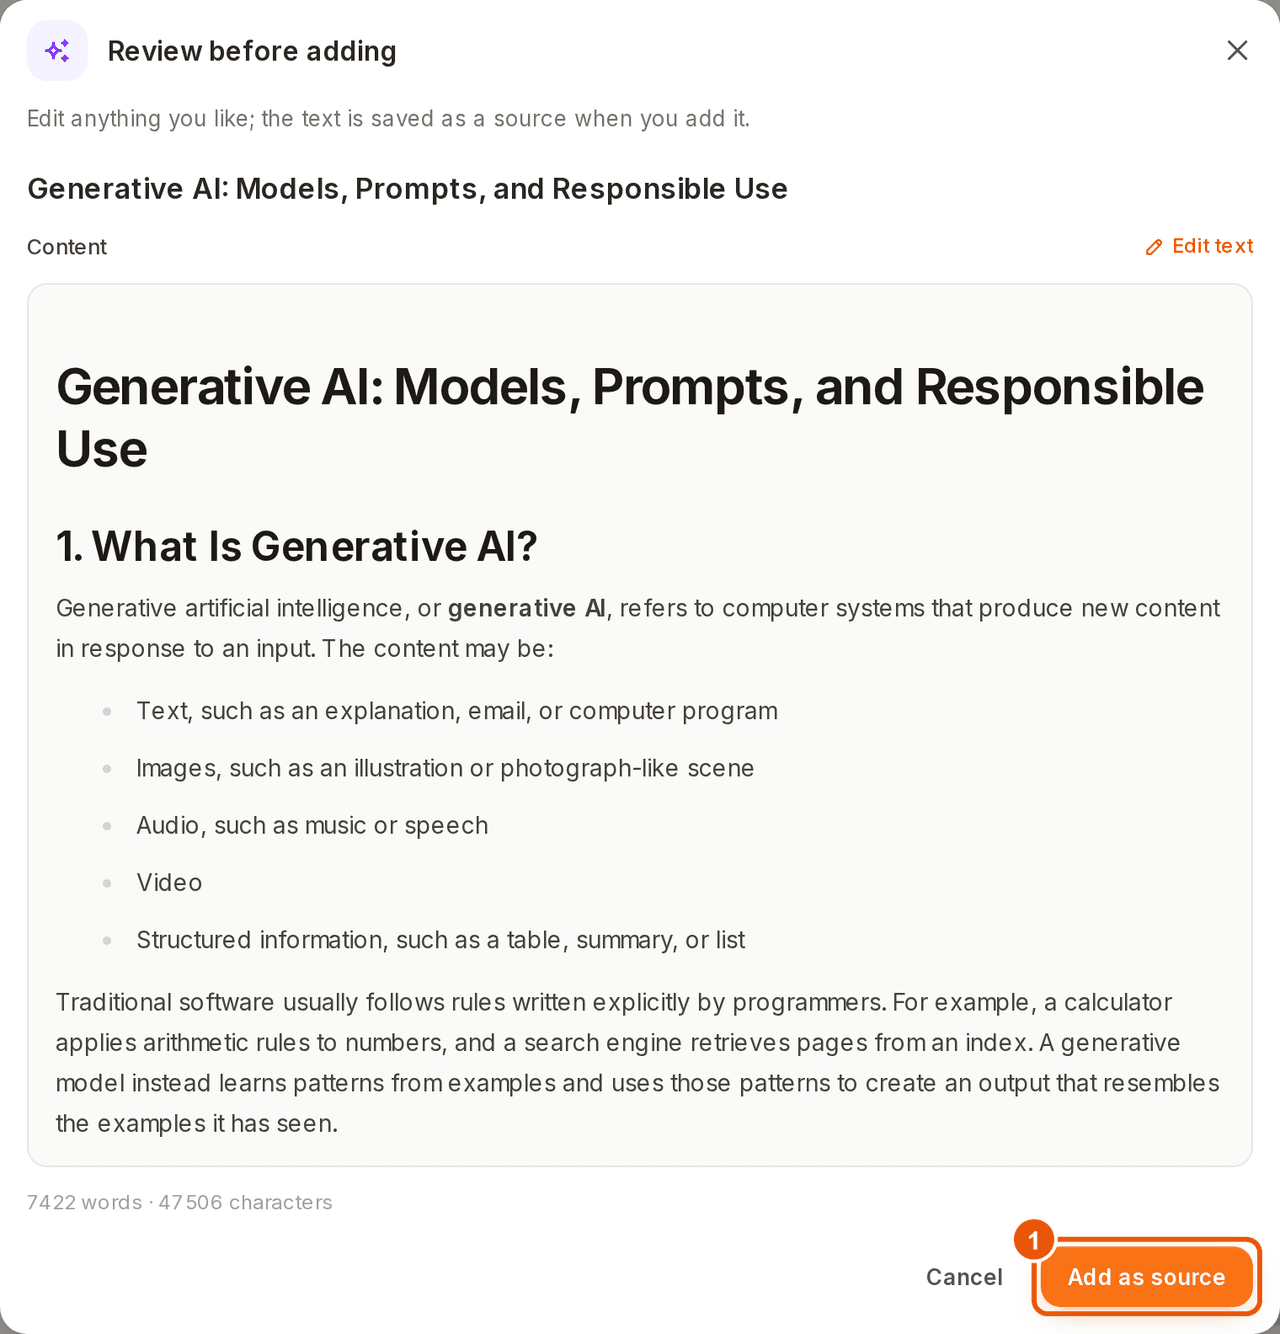
-
A green confirmation appears and the source is listed (1). Uploaded files and videos show their status — “Uploading”, “Processing”, “Transcript pending” or “Ready” — and you can open or remove them. When every source is ready, click “Confirm & continue” (2).
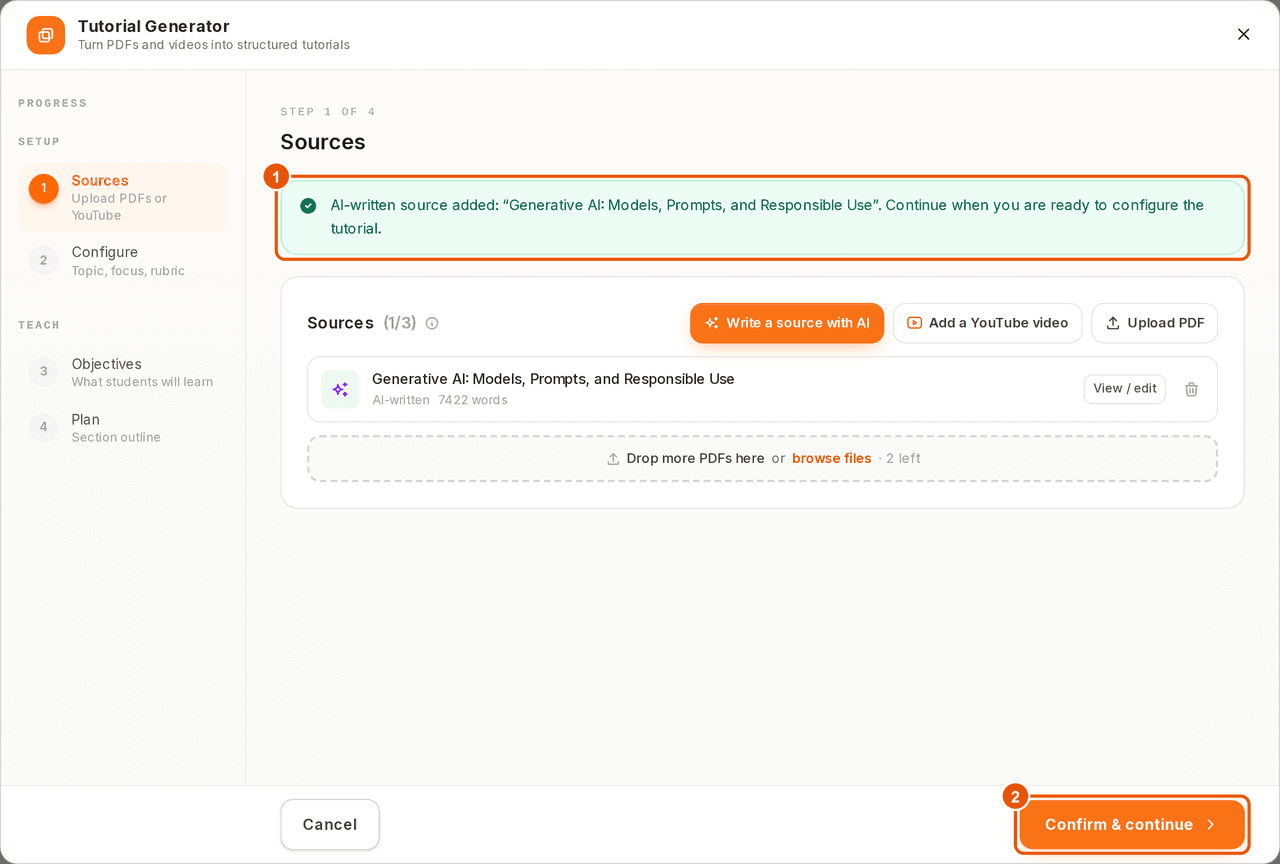
Note: A source that fails shows “Error” with a “Retry” button. Typical causes are a PDF with more than 150 pages, a scanned PDF without selectable text, or a YouTube link to a playlist or private video.
Step 2 — Configure
-
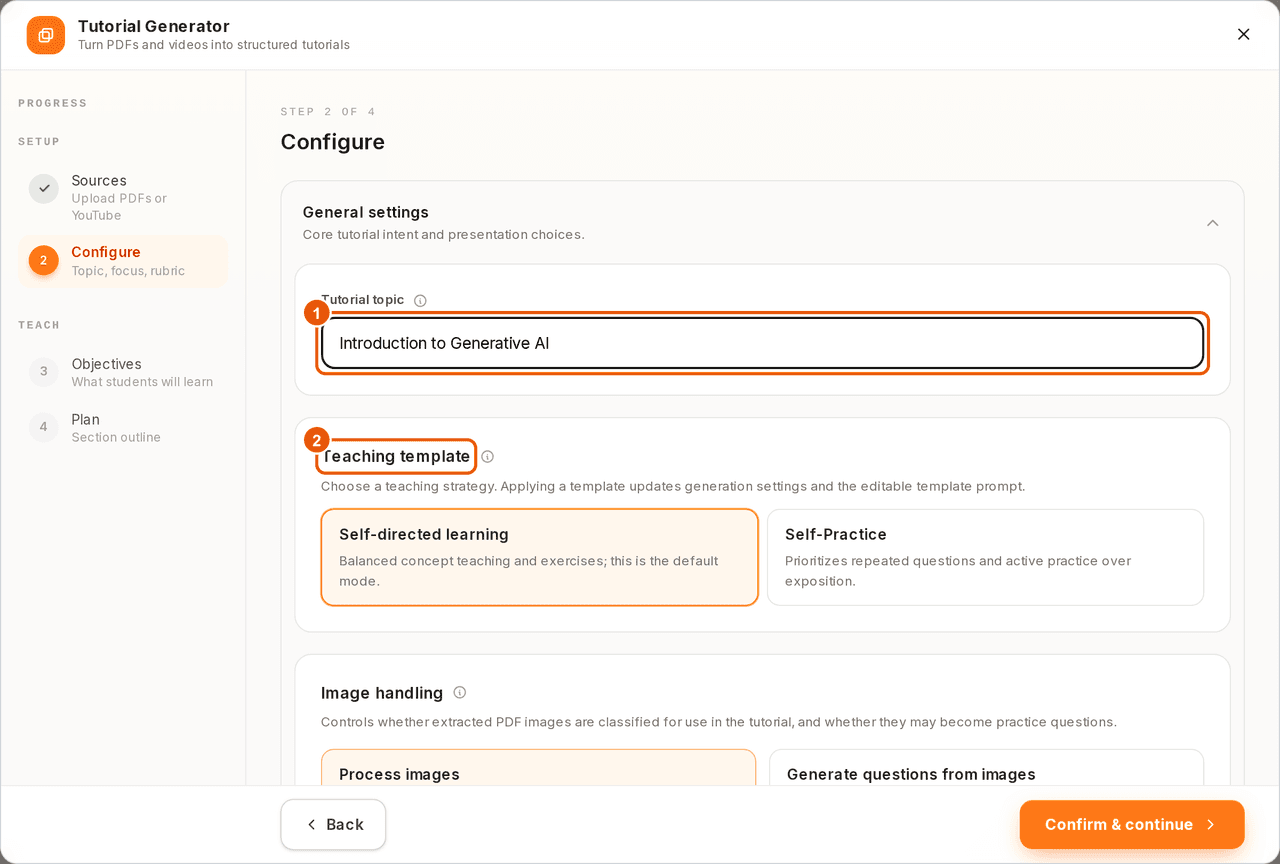
Under General settings:
- Tutorial topic — a concrete title that matches your sources. It anchors everything the generator writes and becomes the draft name.
- Teaching template — “Self-directed learning” (explanations first, then exercises) or “Self-Practice” (exercise-heavy).
Further down you can choose the Focus mode (“Full (Concept + Exercise)” or “Exercise Only”) and decide how videos and PDF figures are used (Video handling, Image handling).
-
Advanced settings are optional. The most useful ones:
- Component guidelines — how many of each activity (tutor chat, figures, videos, multiple-choice, short-answer) each section should contain, or “Exclude” a type entirely.
- Short-answer grading modes — whether short answers get AI rubric grading, are collected without grading, or must match exactly.
- Section count, Minutes per page and Pages — how long the tutorial is and whether it is split into several pages.
- Additional requirements — free text, e.g. “use examples from retail”.
- Levels and Score Ranges — the passing score and rubric levels used for AI grading.
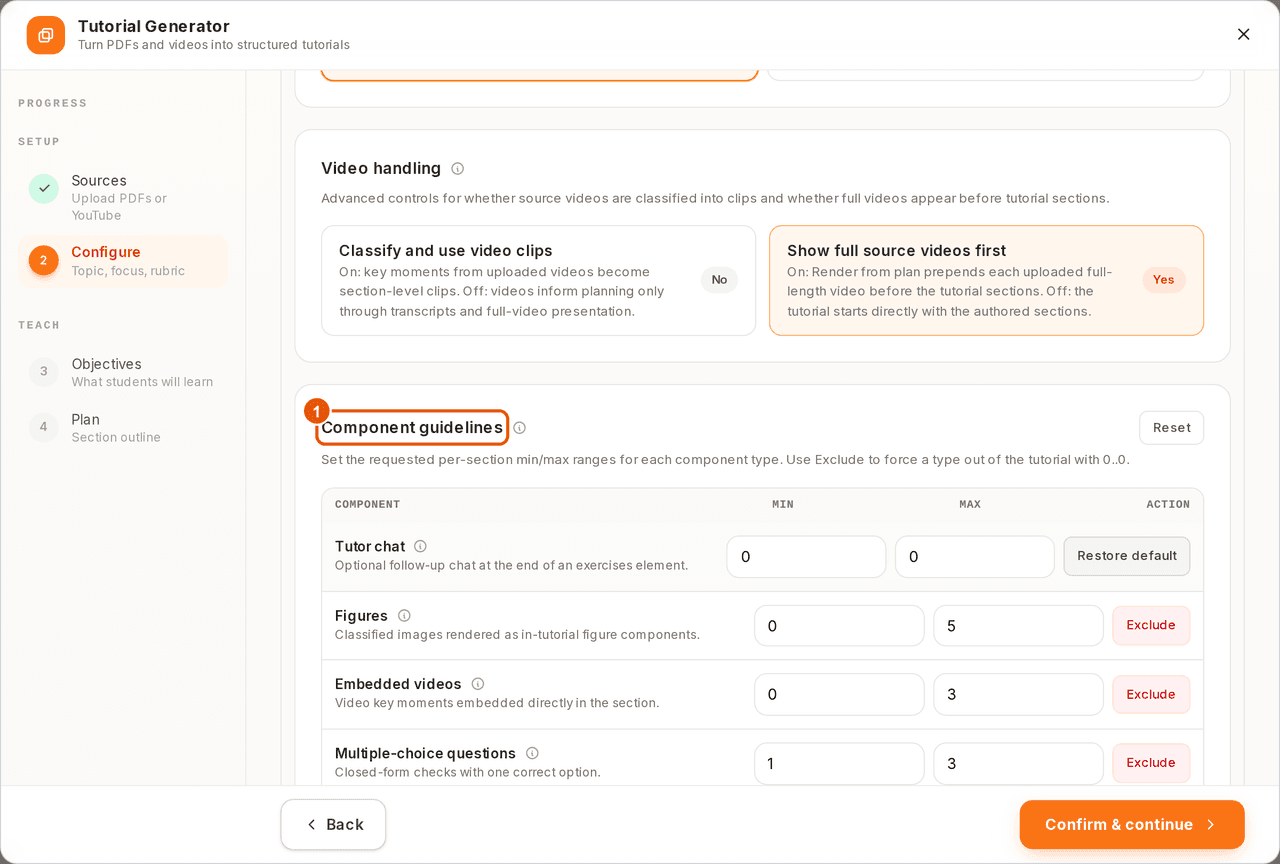
-
Click “Confirm & continue”.
Step 3 — Objectives
-
The generator writes learning objectives from your sources. Edit any objective in place, drag to reorder, or click ”+ Add objective”. The Bloom level shown on each card is assigned by the model.
-
With AI improve you can describe a change (“make them more practical”) and keep everything else; “Undo last AI improve” reverts it.
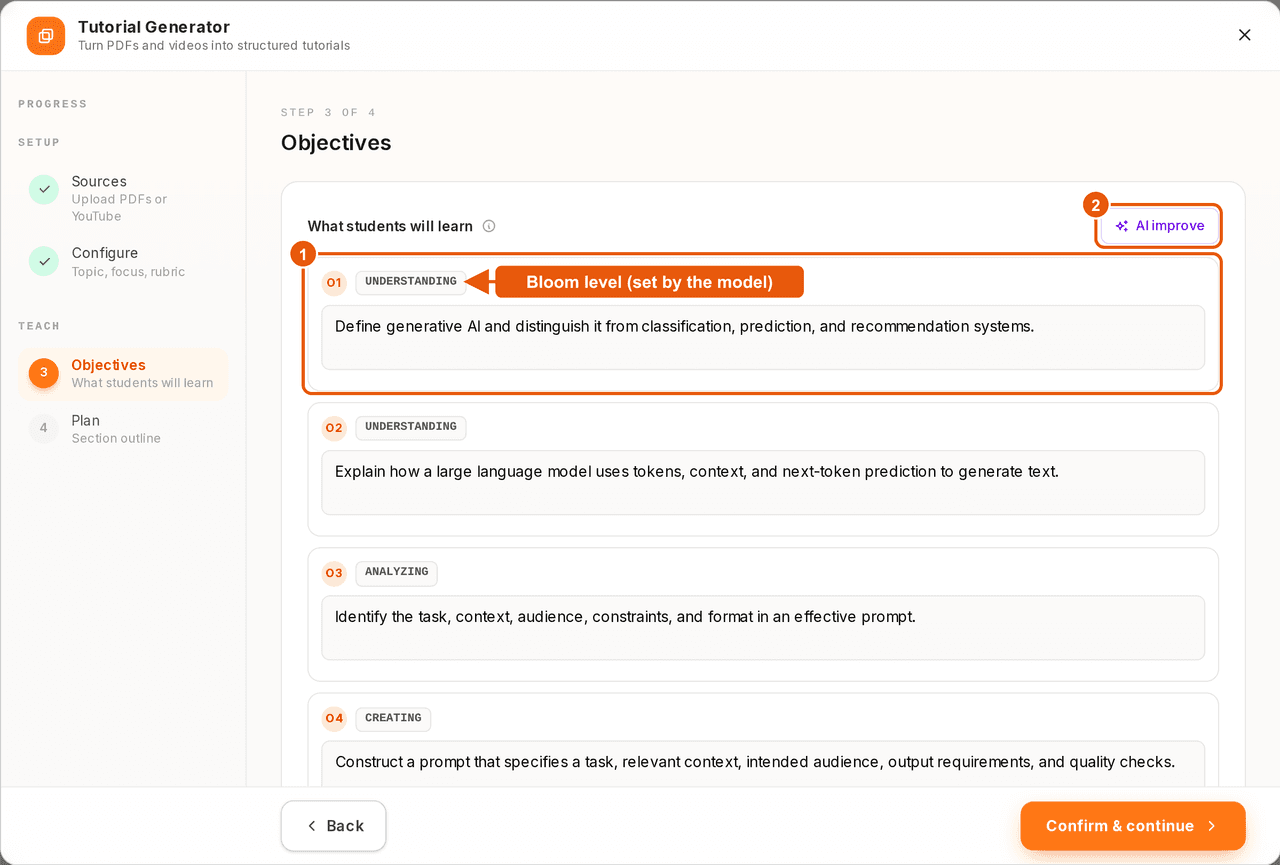
Note: If you go back and change your sources or settings, the objectives are marked out of date. Choose “Keep these objectives” or “Regenerate”.
-
Click “Confirm & continue”.
Step 4 — Plan
-
The generator now classifies your sources and writes a lesson plan. A progress bar shows the stages; this takes a few minutes.
-
Review the plan: the objectives it covers, then one part per page and section with a summary and the figures or video clips it will use. Edit the text directly like a document, remove a figure you do not want, or use AI improve to request a change across the whole plan.
-
When you are happy, click “Confirm & Build Tutorial”.
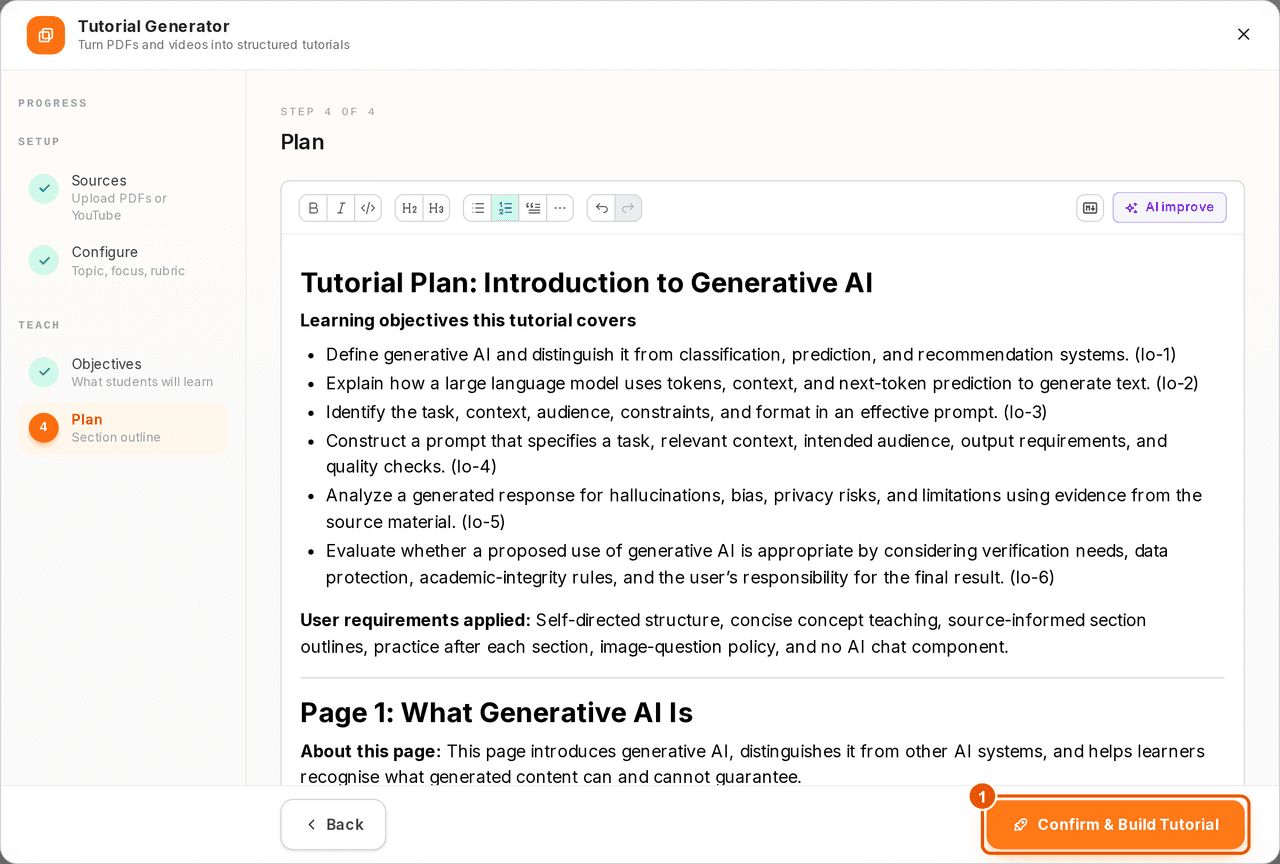
-
The tutorial and its grading rubrics are built and a draft is created. When the overlay finishes you land in the editor.
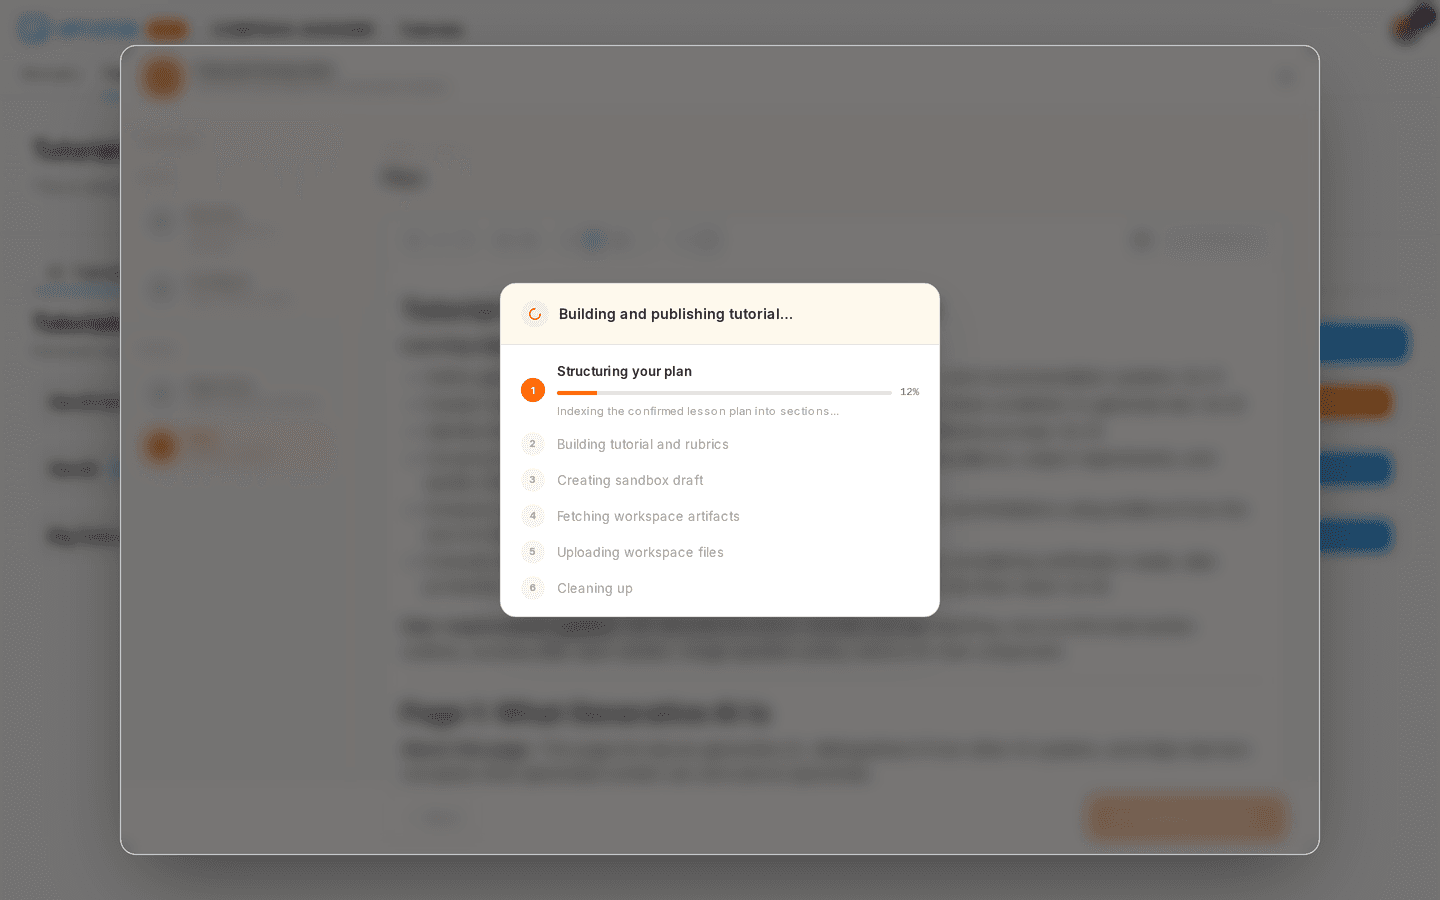
Note: If you close the window before the build finishes, the Tutorials page shows an “Unfinished tutorial setup” banner. Click “Resume” to continue where you left off, or “Discard” to throw the setup away.
Start a new version of an existing tutorial
-
On the Tutorials tab, click “Create new version” next to a tutorial and pick the version to start from (archived versions are listed too). A draft is created and the editor opens.

-
If you already have a draft of that tutorial the button reads “Continue editing draft” instead.

Edit your tutorial
The editor at a glance
-
Pages — the pages of your tutorial. Click one to edit it.
-
Lesson — click anywhere and type. Text is saved automatically; the status next to the title shows “Saving…” then “Saved”.
-
Properties — settings of the selected block (for example the options of a question).
-
WYSIWYG / Advanced — switch between the visual editor and the source files (see Working with source files).
-
Publish — make the draft available to students.

Note: The editor needs a desktop-size screen. Published tutorials work on phones and tablets.
Pages
-
Click “New page” at the bottom of the Pages panel and give it a title.
-
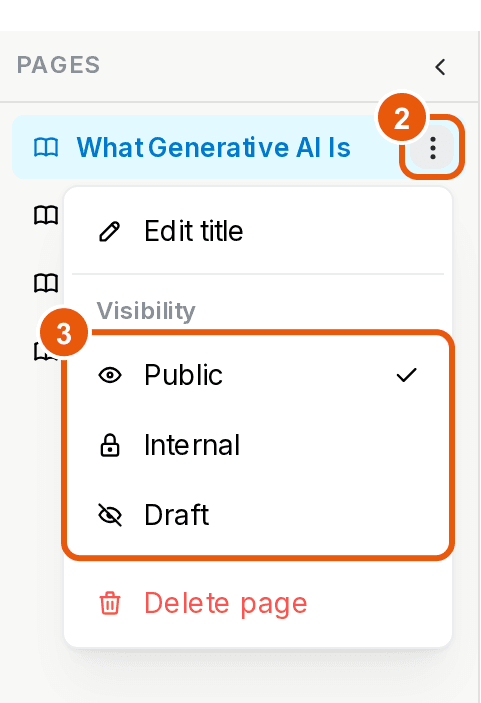
The ”⋮” menu next to a page lets you rename it, change its visibility, or delete it. Drag pages to reorder them.
-
Visibility controls who sees the page after publishing:
Visibility Who sees it Public Students and course admins Internal Course admins only (teaching notes, answer keys) Draft Nobody — the page is kept but not shown to anyone
Write and format content
-
Type directly into the lesson. Select text to get the formatting toolbar, or use shortcuts such as
##for a heading and-for a list. -
Type
/on an empty line to insert a block: headings, lists, quotes, images, or one of the activity components.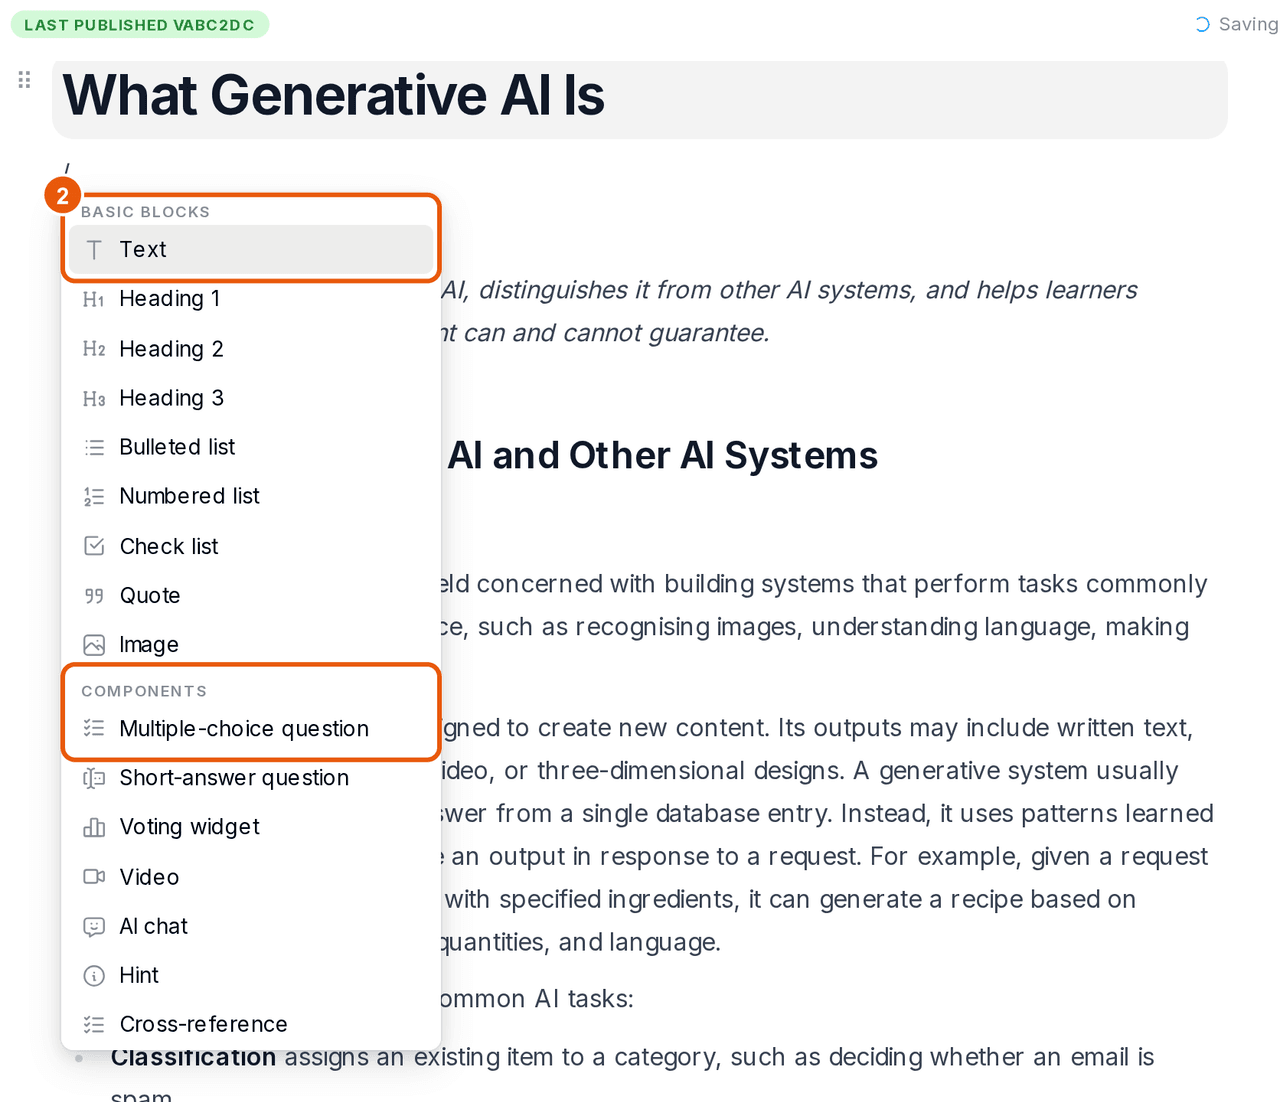
-
Hover a block to show its handle on the left. Use it to turn the block into something else, insert a block above or below, drag it elsewhere, or delete it.
Add activities
Activities are inserted from the / menu under Components. Click an
activity to edit it in the Properties panel on the right.
-
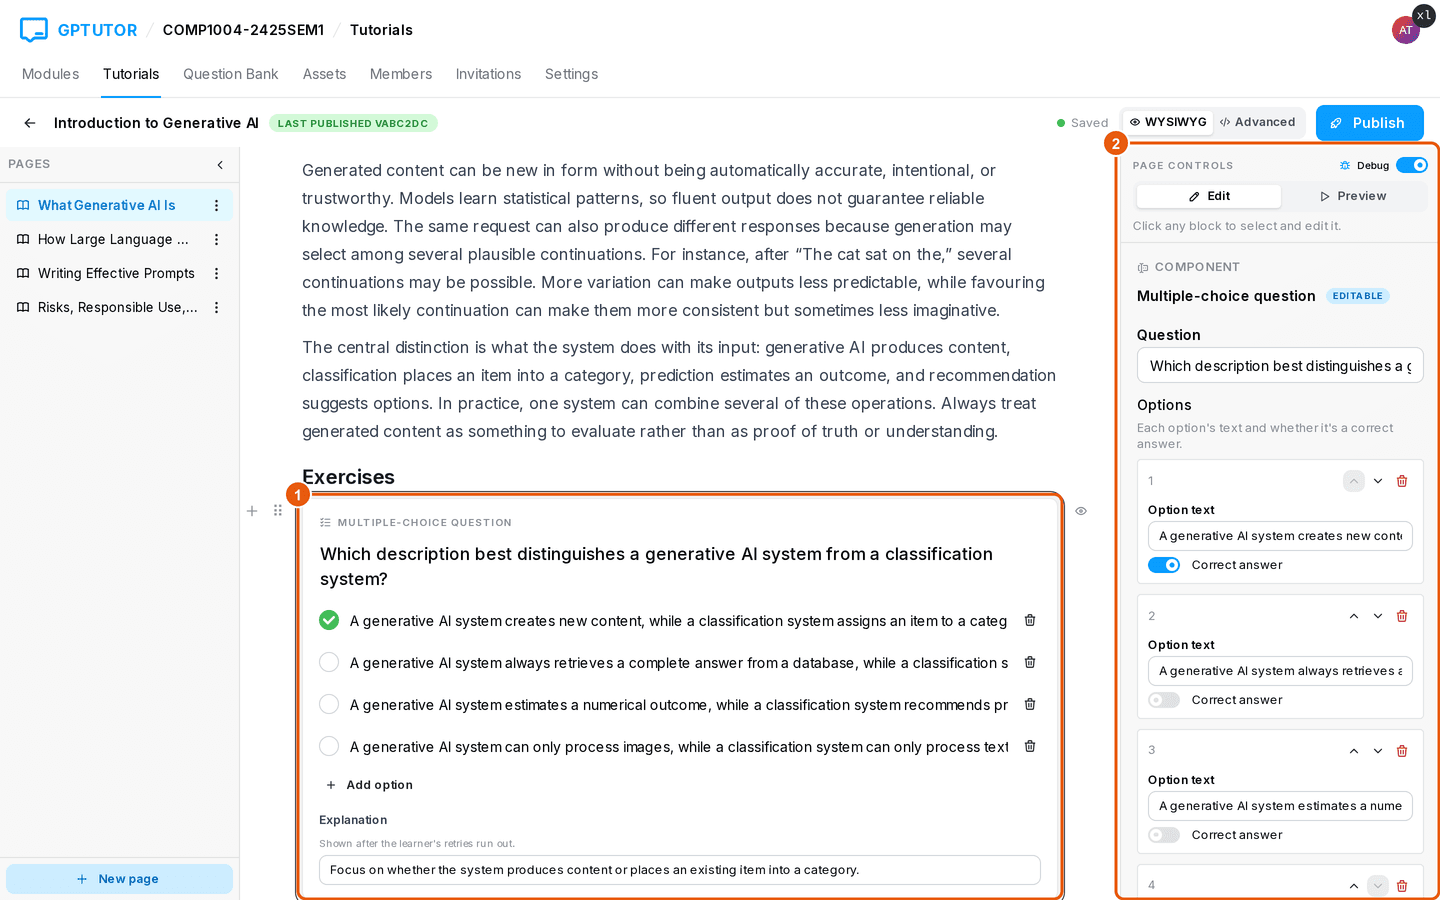
Multiple-choice question — the selected card (1) can be edited in place; the Properties panel (2) holds the question text, the options and which of them are correct, the explanation shown when attempts run out, and “Max retries”.
-
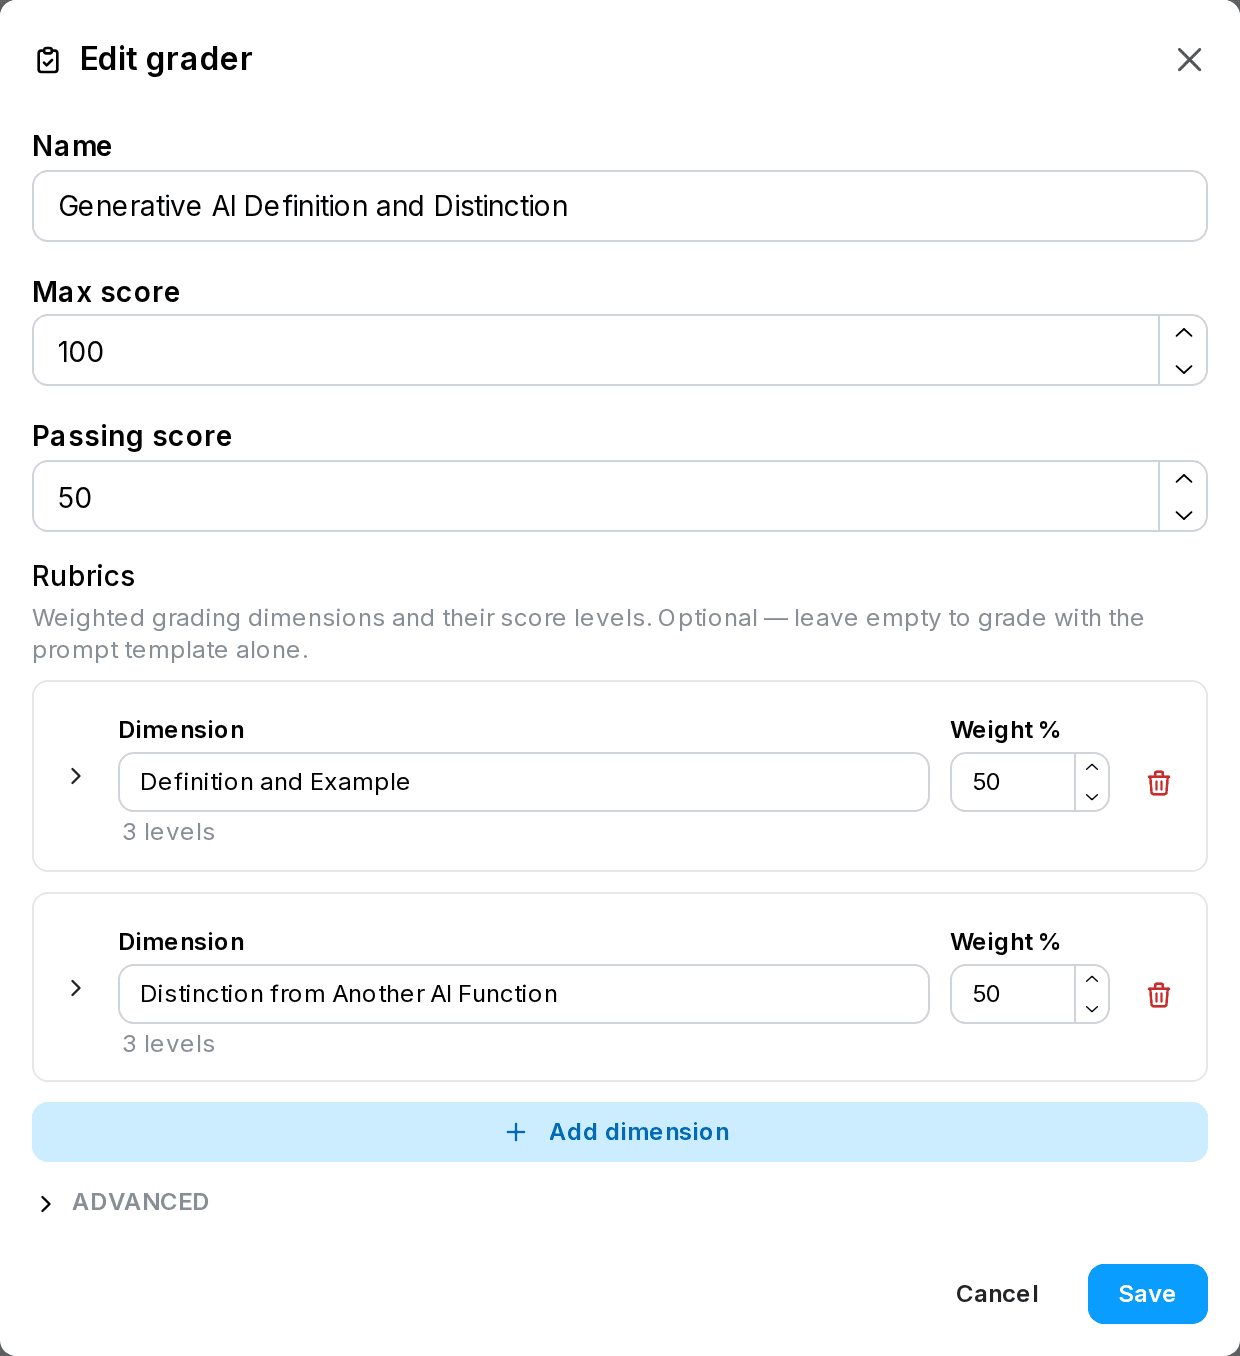
Short-answer question — question text, an optional reference answer and “Max retries”. Click the AI grading button on the card to attach a grader: give it a name, a maximum and passing score, and a rubric of weighted dimensions, each with score levels. Answers are then graded by AI and students get feedback per dimension.
-
Video — a YouTube link or uploaded video, optionally trimmed with a start and end time.
-
AI chat — a tutor chat scoped to the lesson.
-
Voting widget — a live poll. Once published, you get a “Teacher controls” bar inside the lesson to open and close the vote, show results to students and export the votes as CSV.
-
Hint — a coloured callout (Info, Success, Warning, Danger).
-
Cross-reference — a link to a figure or section, for example “Fig. 2”.
Note: A component that is not fully configured shows “Not configured yet”. You can still publish, but students will see a notice in its place.
Preview as a student
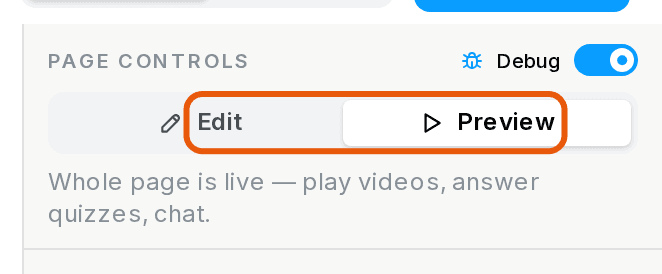
Switch Edit / Preview in the Properties panel to try the page exactly as students will: play videos, answer the questions, chat.
Working with source files (optional)
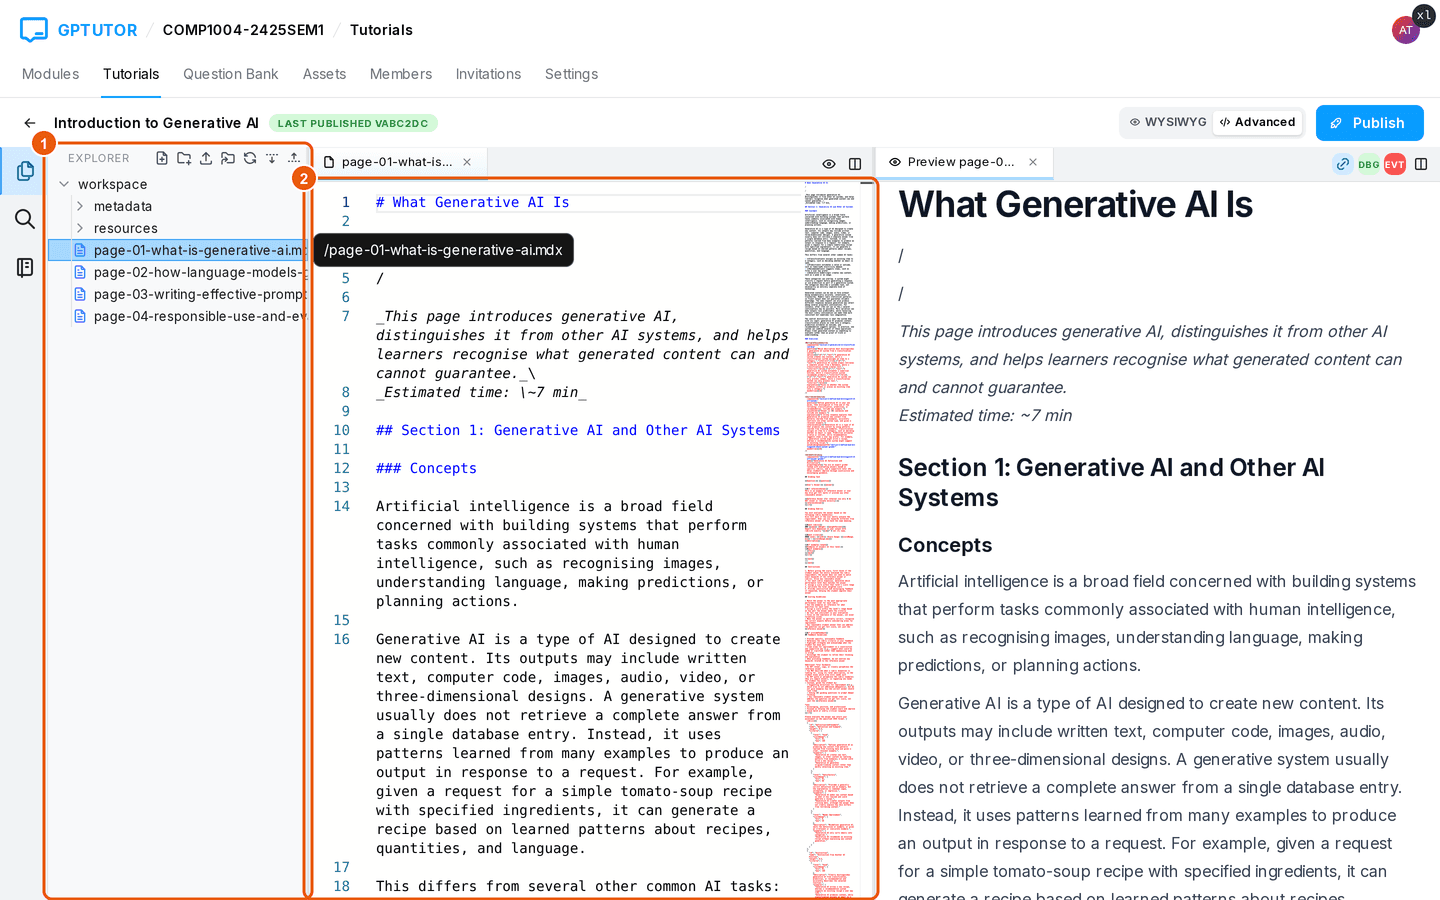
The Advanced mode shows the tutorial as files, which is useful for bulk edits, uploading images, or pasting content from elsewhere.
-
Explorer lists the files; the icons above it create, upload and refresh files.
-
The editor in the middle shows the selected file; press Cmd/Ctrl+S to save. The preview on the right updates as you type.
-
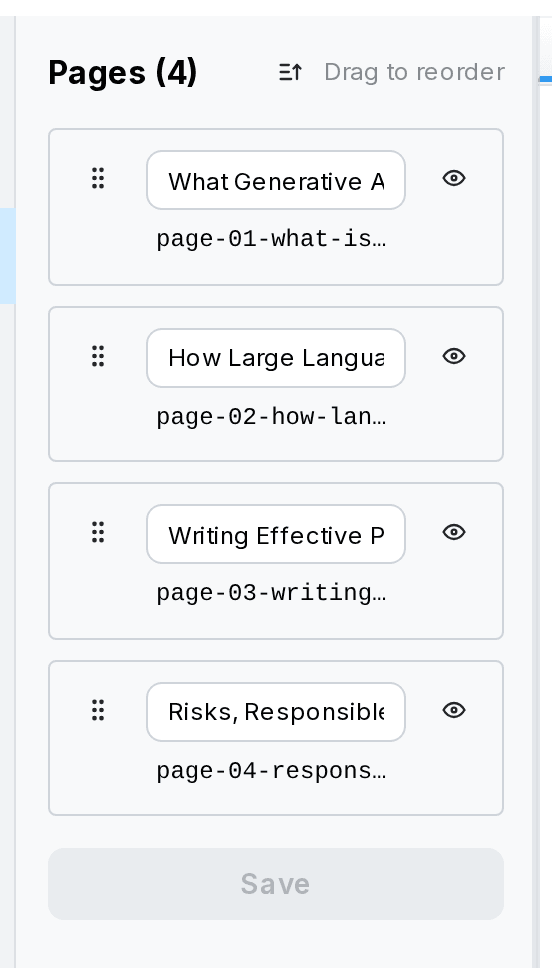
The Manifest panel lists the pages in order with their visibility. If you add or remove files, click “Sync with file tree” and then “Save”.
If something goes wrong while editing
| What you see | What to do |
|---|---|
| ”Couldn’t save” with “Retry” | A connection problem. Click “Retry”; nothing is lost while the tab stays open. |
| ”Can’t save this change” with “Open source” | The change cannot be expressed visually. Open the source file and edit it there. |
| A conflict dialog (reload or overwrite) | The draft was changed in another tab. Reload to take those changes, or overwrite them. |
| ”Removed components” dialog | An edit would delete an activity. Choose “Restore” to keep it or “Delete from page”. |
| ”Read-only” badge in the top bar | The draft belongs to another course admin. Use “Fork as your own draft” on the Drafts tab. |
Publish
-
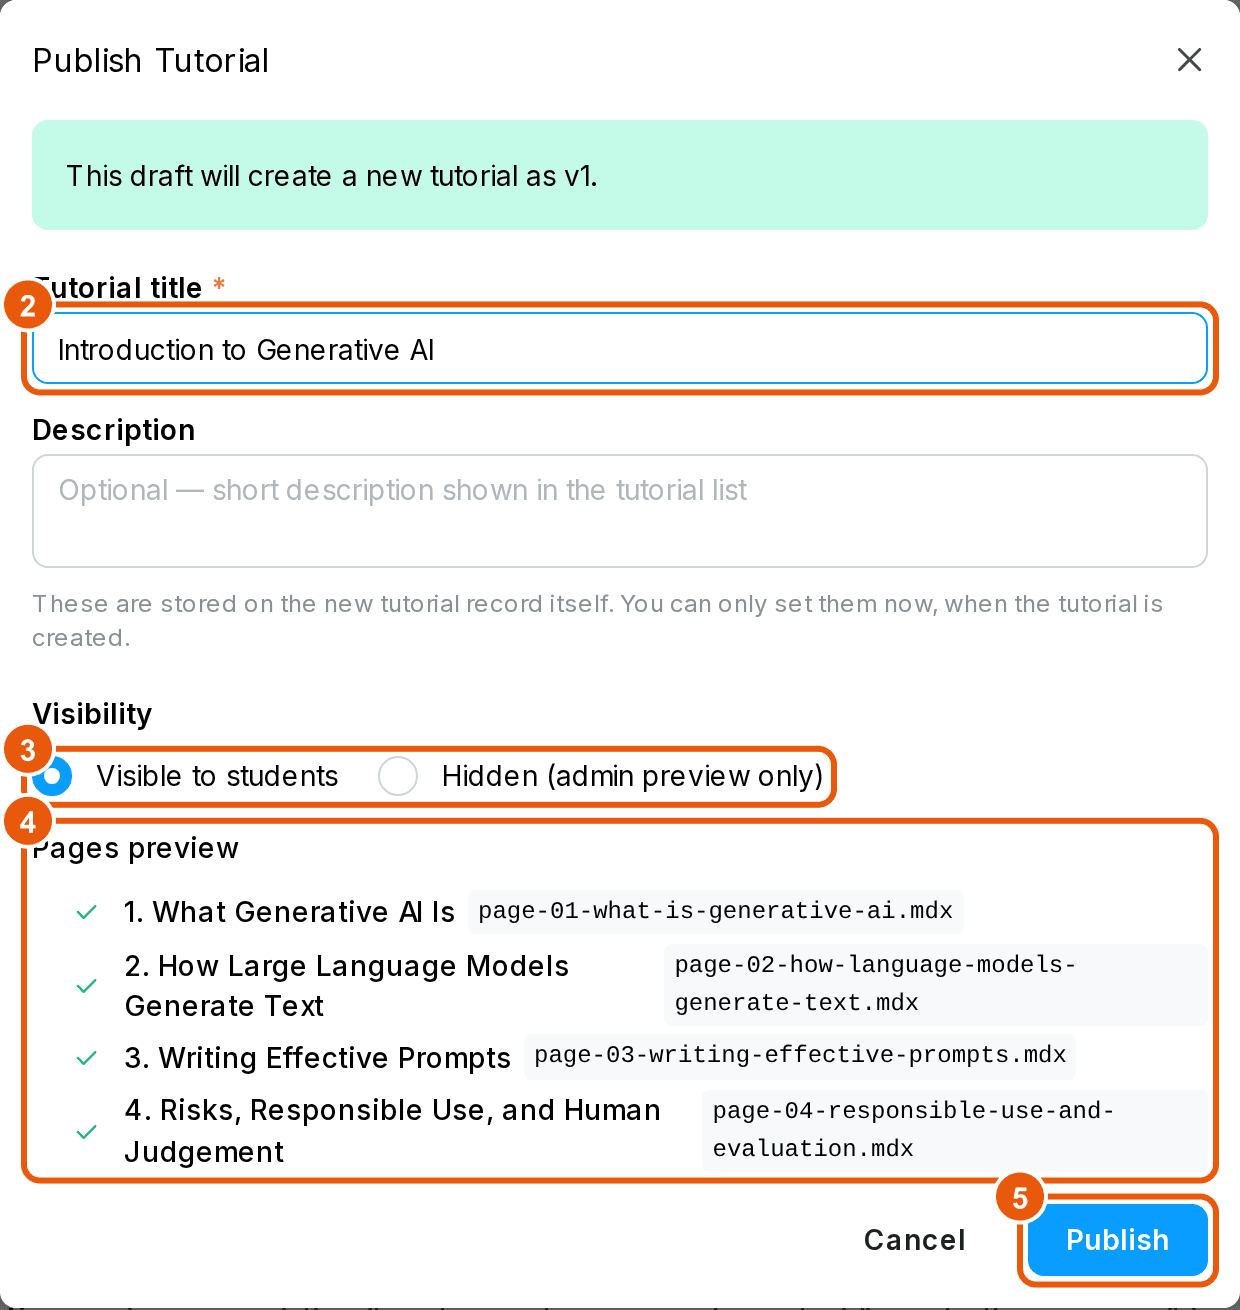
Click “Publish” in the top bar of the editor.
-
For a brand-new tutorial, give it a title and an optional description. For a new version of an existing tutorial these are locked — rename the tutorial from the Tutorials tab instead.
-
Choose the visibility: “Visible to students” or “Hidden (admin preview only)”. You can change it later.
-
Pages preview shows which pages will be served. Red errors block publishing; a yellow “Some components look unfinished” warning does not.
-
Click “Publish”.
When you publish a new version of an existing tutorial, the dialog also lists what changed compared with the current version, and reminds you that the previous version will be archived automatically.

After publishing you return to the Tutorials tab. Your draft is kept, so you can keep working on the next version.
Manage published tutorials
-
Click a tutorial row to expand it.
- Visible to students — hide or show the tutorial without unpublishing.
- Allow student restart — let students wipe their progress and start again.
- Show archived — list older versions.
- Archive — take a version down. Students are sent to the latest active version; archived versions can be deleted later.

-
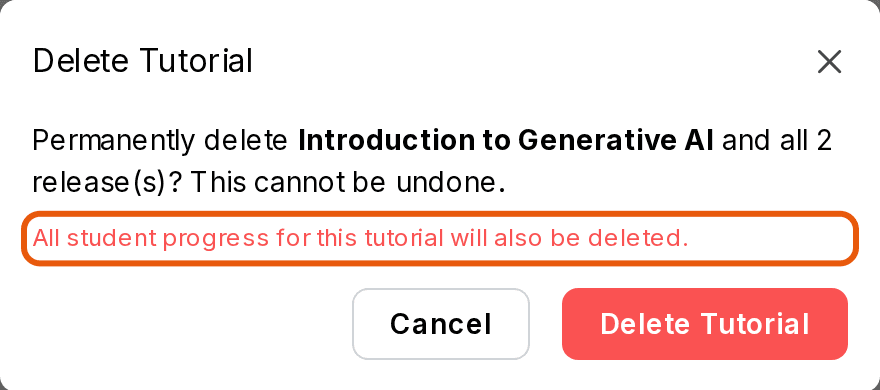
The pencil icon renames the tutorial. The bin icon deletes the tutorial with every version and all student progress — this cannot be undone.
Drafts tab
The Drafts tab lists every unpublished draft in the course with its origin (“New tutorial” or “Forked from release”), author and last change.
-
Open your own drafts in the editor.
-
Fork as your own draft to work on a colleague’s draft (their copy stays untouched).
-
Rename or Delete a draft. Deleting a draft never affects published versions.

Check a tutorial as your students see it
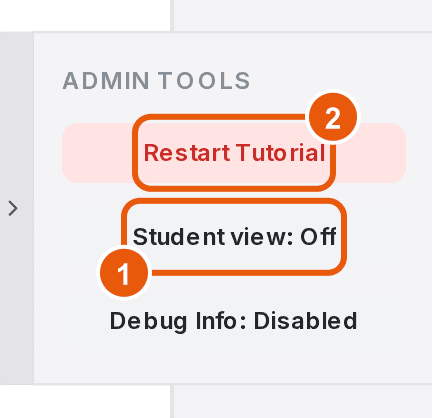
Open any version and use the Admin Tools panel on the right edge:
-
Student view hides the admin-only parts of the page.
-
Restart Tutorial wipes your own progress so you can try the activities again.
Follow student progress
-
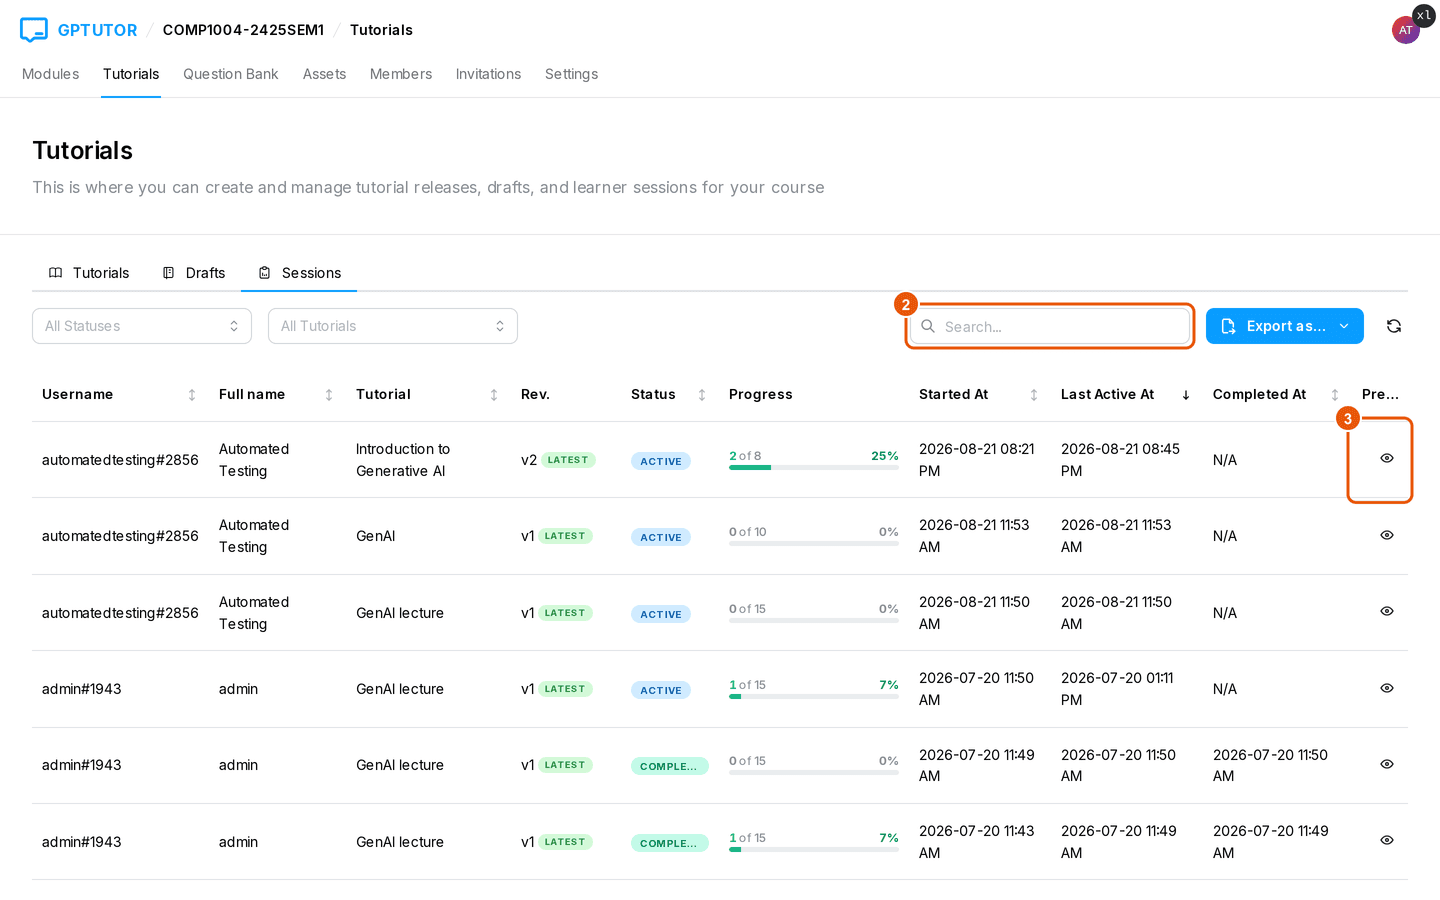
Open the Sessions tab. Each row is one student’s session on one version: status, progress, when it was started and last active.
-
Filter by status or tutorial, or search for a student.
-
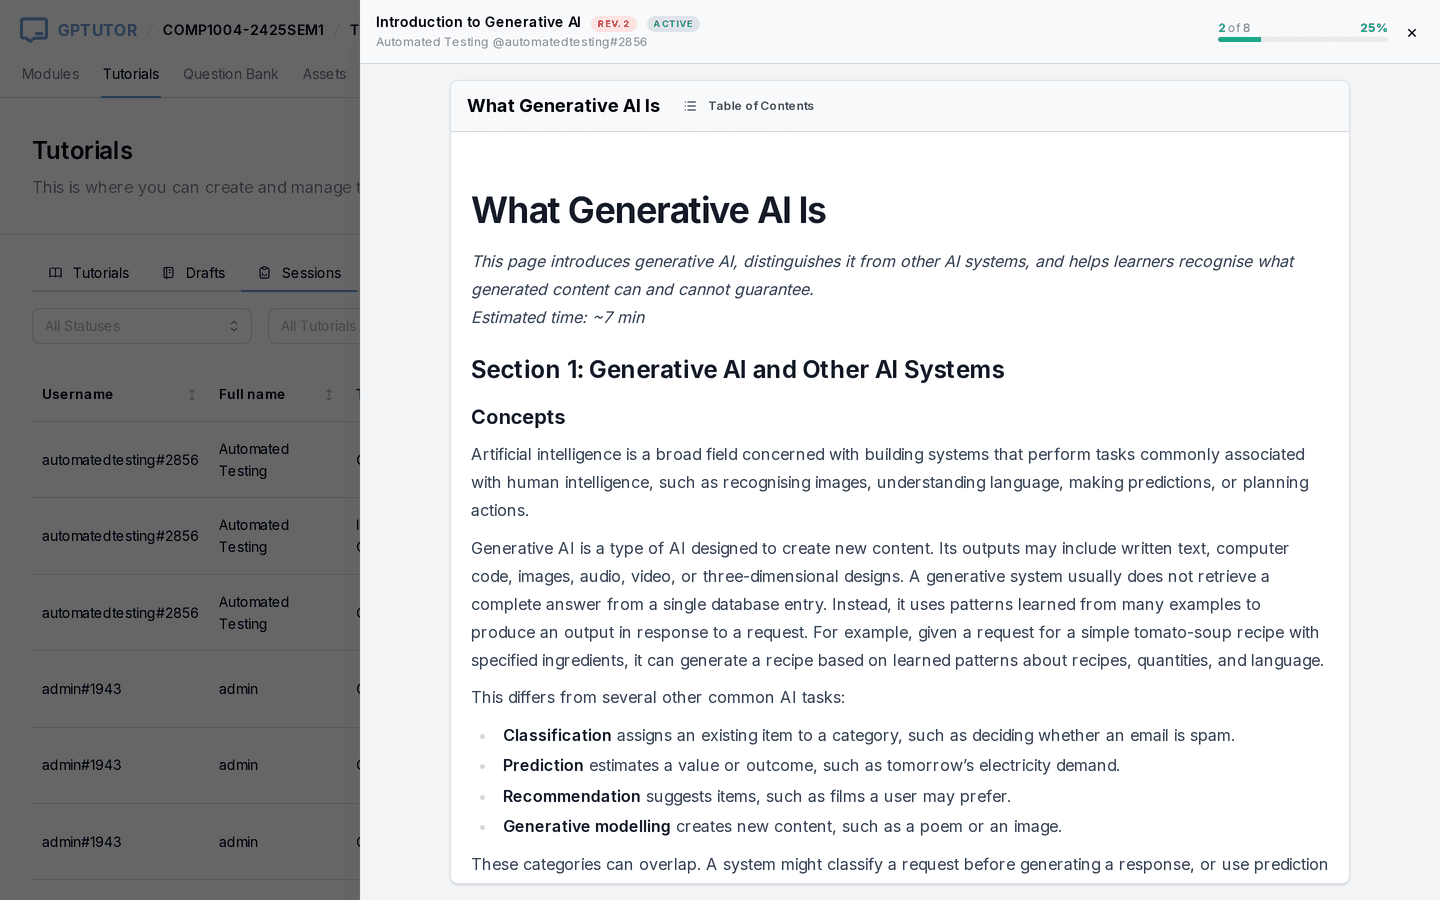
Click the Preview icon to see exactly what the student saw — their answers, grading results and video progress — without changing anything.
Export results
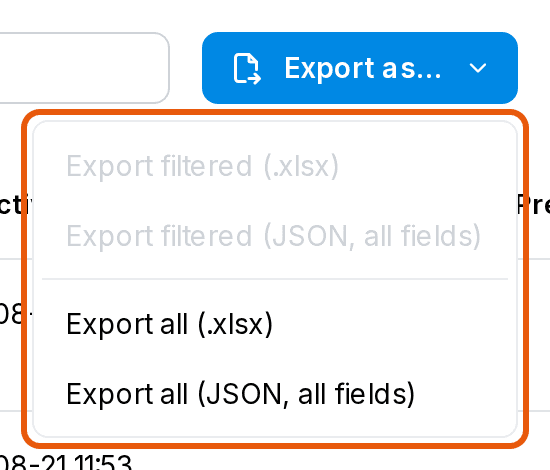
Click “Export as…” and choose what to download:
| Option | Contents |
|---|---|
| Export filtered (.xlsx) | The rows currently shown — one line per session, good for a quick look in Excel |
| Export filtered (JSON) | The same rows with every answer, plus the question text and correct answers of each version |
| Export all (.xlsx / JSON) | Every session in the course, ignoring filters |
Run a live poll
If a lesson contains a Voting widget, instructors see a “Teacher controls” bar above it when viewing the published tutorial:
- Open or close the vote, allow students to change their vote, and choose whether students see the results and each other’s reasons.
- Set an “Auto-close at” time for timed polls.
- “View full report” shows every vote; “Export CSV” downloads them.
Limits and troubleshooting
| What you see | Why / what to do |
|---|---|
| ”Up to 3 sources in total” | Combine material into fewer files, or build a second tutorial. |
| A PDF is rejected for its page count | The limit is 150 pages. Split the file or export only the relevant chapters. |
| ”Transcript pending” for a long time | Long videos take several minutes. You can close the window; the status keeps updating. |
| A YouTube link is refused | Only single public videos work — not playlists, channels, shorts links you cannot open, or private videos. |
| ”Retry failed section” in the Plan step | One section could not be generated. Click it to retry just that section; your other edits are kept. |
| ”Cannot publish” in the Publish dialog | The draft has an error the list describes (for example an empty page). Fix it and publish again. |
| ”This editor needs a larger screen” | Use a laptop or desktop to edit. Students can still use the published tutorial on a phone. |
| A colleague’s draft opens read-only | Only the author can edit a draft. Fork it from the Drafts tab to get your own copy. |
Quick reference — every control you will see
| Where | Control | What it does |
|---|---|---|
| Tutorials tab | New tutorial | Start the Tutorial Generator |
| Tutorials tab | Open latest | Open the current version |
| Tutorials tab | Create new version | Start a draft from an existing version |
| Tutorials tab | Continue editing draft | Reopen your unfinished draft of that tutorial |
| Tutorials tab | Visible to students | Show or hide the tutorial |
| Tutorials tab | Allow student restart | Let students reset their progress |
| Tutorials tab | Archive / Delete | Take a version down / remove an archived version |
| Drafts tab | Open / Fork / Rename / Delete | Manage drafts |
| Editor | WYSIWYG / Advanced | Visual editor or source files |
| Editor | Edit / Preview | Edit the page or try it as a student |
| Editor | Publish | Create a new published version |
| Viewer | Admin Tools | Student view, Restart Tutorial |
| Sessions tab | Preview | Read-only replay of a student’s session |
| Sessions tab | Export as… | Download sessions as .xlsx or JSON |